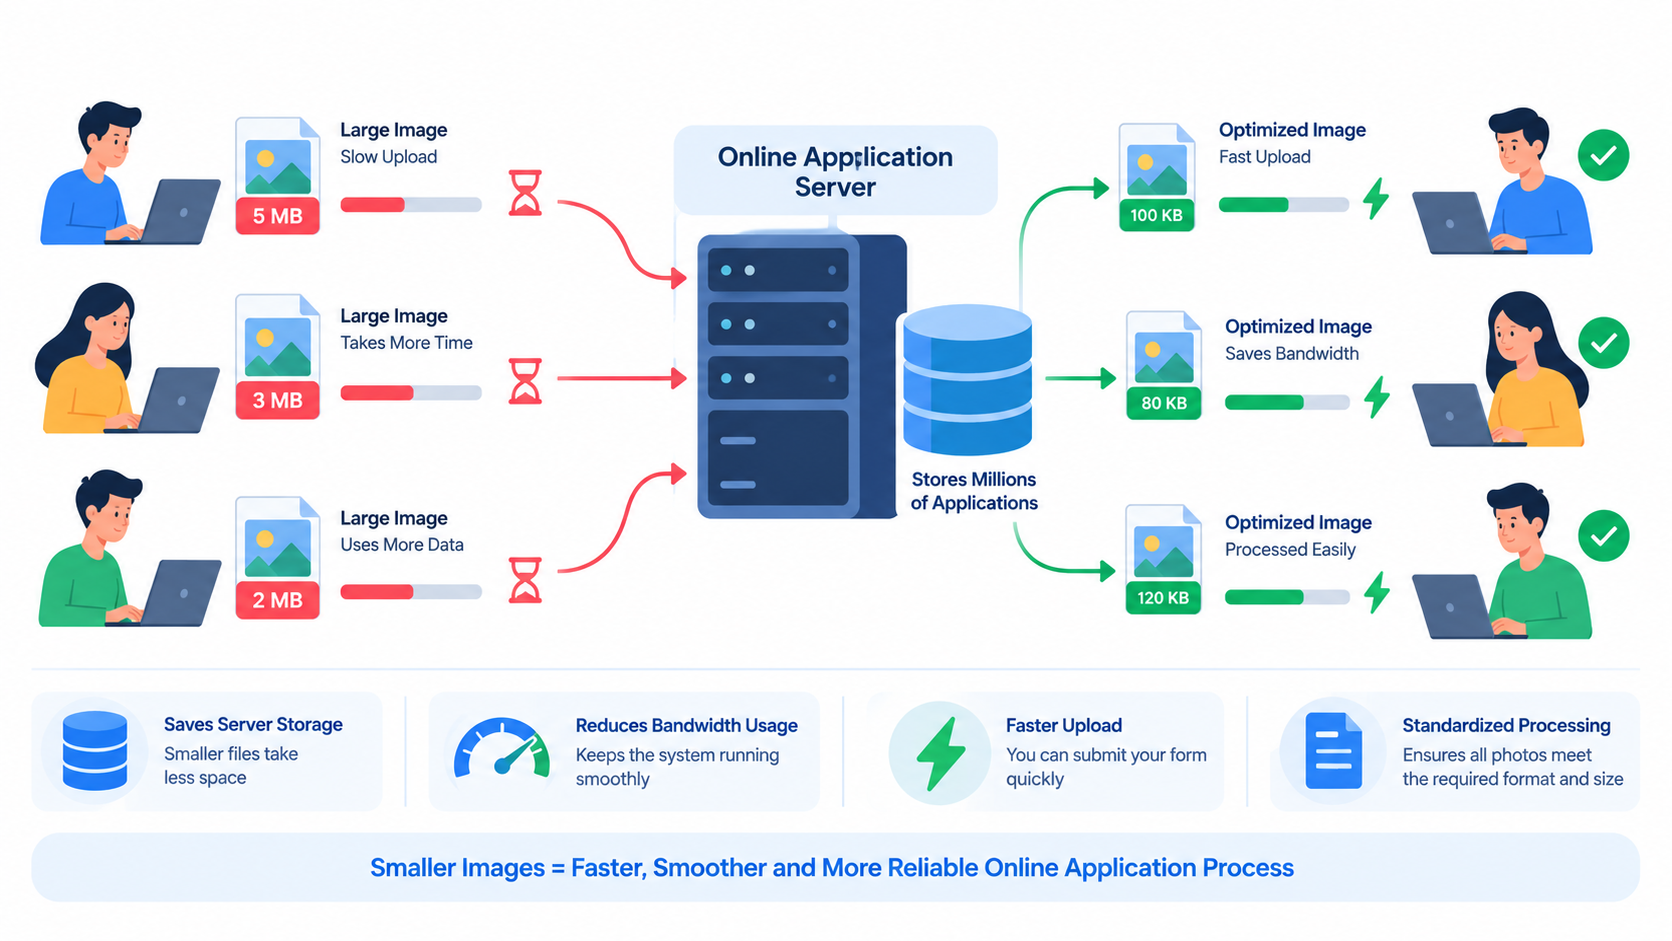

Uploading a photo or signature to an online application can become frustrating when the website says that your image file is too large. Government exams, college admissions, job applications, scholarship forms, passport applications, and other online forms often specify strict file-size limits such as 20KB, 50KB, 100KB, 200KB, or 500KB. If your image is larger than the required limit, the form may reject it even when the photo itself looks perfectly fine. Fortunately, you can reduce image size in KB without necessarily reducing its visual quality significantly. In this guide, you will learn how to reduce image size in KB for online forms, how compression and resizing work, which image formats are best, how to reach a specific KB limit, and how to avoid common upload errors.
Why Do Online Forms Require Images in a Specific KB Size?
Many online forms place limits on image file size because smaller files require less storage, bandwidth, and processing power. When thousands or millions of applicants upload photographs, signatures, certificates, or identity documents, large files can put unnecessary pressure on the website's servers. A 5MB photograph may look excellent, but it contains far more digital information than an application system normally needs. For a small photograph displayed on an application form, a file of 50KB, 100KB, or 200KB can often provide sufficient visual information while using much less storage.
Another reason is standardization. Application portals need to process files consistently, and predefined file-size and dimension requirements make automated verification easier. An online form may specify something like “JPG format, 20KB–50KB” or “photograph between 50KB and 100KB.” These requirements can vary from one application to another, so it is important to read the instructions on the specific form before changing your image. Reducing the image to the wrong size may cause another error. For example, making a photo smaller than 20KB when the portal requires a minimum of 20KB will still result in rejection. Therefore, the goal is not simply to make an image as small as possible; the goal is to create a file that satisfies the form's exact size, format, and dimension requirements.
How to Reduce Image Size in KB Online Without Losing Quality
The easiest way to reduce image size in KB for online forms is to use an online image compression tool. A good image compressor analyzes the image data and removes unnecessary information or stores it more efficiently. You generally upload your JPG, JPEG, PNG, or another supported image, choose the required compression or target size when available, and download the optimized file.
However, compression is only one part of the process. If the original photograph has very large dimensions for example, several thousand pixels wide resizing it before compression can dramatically reduce its file size. For an online form, you usually do not need the same dimensions required for printing a large photograph. A smaller image can contain enough detail for an application portal while requiring significantly less storage. The best workflow is therefore to check the form's required dimensions and file format first, resize the image if necessary, compress it, and then check the final file size. Always open the resulting image before uploading it to ensure that the photograph remains clear and recognizable.
Step-by-Step: How to Reduce Image Size in KB for Online Forms
Step 1: Check the exact requirements of the online form. Before editing anything, identify the minimum and maximum file size, accepted file format, required width and height, and any other instructions. Do not assume that every application accepts the same settings. One portal may require a photograph between 20KB and 50KB, while another may allow up to 200KB. Some forms also specify exact dimensions, such as a particular pixel width and height. If the website says “JPG only,” converting the image to PNG will not solve the problem even if the PNG file is small. Keeping the original instructions nearby will help you avoid unnecessary trial and error.
Step 2: Choose the correct image and check its current size. On a Windows computer, you can right-click the image and open its properties to see the file size and dimensions. On a smartphone, the gallery or file manager may show similar information. If your photograph is 2MB and the form permits only 100KB, you know that substantial optimization is required. If the photograph is already close to the target, you may only need moderate compression. Also check whether you are working with the correct photograph. Uploading a screenshot, a WhatsApp-compressed copy, or an incorrectly cropped image can create quality problems later.
Step 3: Resize and compress the image according to the requirement. If the original image dimensions are much larger than necessary, resize it first. Then use an image compression tool to reduce the remaining file size. For example, if you need an image below 100KB, start with a suitable dimension and compress the JPG until the resulting file falls within the allowed range. If the form specifies a range such as 20KB–50KB, do not stop at 10KB simply because the file is smaller. A file below the minimum may be rejected. After compression, verify the file size, extension, dimensions, and image quality before uploading it.
How to Make an Image Less Than 20KB, 50KB, 100KB, or 200KB
Reducing an image to a specific KB size requires a slightly different approach from ordinary image compression. If a form says that your photograph must be between 20KB and 50KB, the target is a range rather than a single number. Start by understanding the original file. A high-resolution smartphone photograph may be several megabytes, so simply lowering image quality once may not produce the required result. Resizing the image can provide a much larger reduction, after which compression can be used to fine-tune the final size.
For a target such as 50KB, it is generally better to aim comfortably inside the allowed range rather than trying to hit exactly 50KB. For example, if the permitted range is 20KB to 50KB, a properly readable file around 35KB–45KB can give you some safety margin. The same principle applies to a 100KB limit. If the form accepts files up to 100KB, a file around 80KB or 90KB may be preferable to a file that is exactly 100KB, provided that image quality and other requirements are satisfied. File-size calculations can also vary slightly between operating systems and upload systems, so leaving a small margin can be useful.
When an image refuses to become small enough, reduce its pixel dimensions gradually rather than destroying its quality through excessive compression. For example, a very large photograph may contain millions of pixels that are unnecessary for a small online application preview. Lowering the dimensions can remove a substantial amount of data while maintaining a relatively clean appearance. If you need to go from a large file to an extremely small target such as 20KB, some loss in image quality may be unavoidable. The objective should be to find the best balance between file size, readability, and the application's technical requirements.
Reduce Image Size Without Losing Quality: Compression vs. Resizing
Image compression and image resizing are related but different processes. Compression primarily changes how the image data is stored, while resizing changes the number of pixels in the image. A photograph measuring 4000 × 3000 pixels can contain a huge amount of information even if the image is visually simple. Reducing it to dimensions appropriate for an online form can significantly decrease the amount of data that needs to be stored. Compression can then further reduce the file size by optimizing that smaller image.
There are two broad types of compression: lossy and lossless. Lossy compression removes some image information to achieve a smaller file. JPG is commonly used for photographs because it can produce a significant reduction in file size while maintaining acceptable visual quality at suitable compression levels. Lossless compression attempts to preserve the original image information, but it generally cannot reduce photographs as aggressively. PNG is excellent for certain graphics, transparent images, screenshots, and images containing sharp text, but a PNG photograph can sometimes be much larger than a comparable JPG.
The ideal method depends on the form's requirements and the type of image. If you are uploading a normal passport-style photograph, JPG or JPEG is often a practical choice when the application permits it. If you are uploading a signature or a graphic containing sharp edges, the appropriate format may differ depending on the instructions. Never change formats blindly. A format conversion can sometimes make the file larger rather than smaller. The best strategy is to follow the application's accepted formats first, then optimize the image within those requirements. After processing, zoom in and inspect important details such as the face, signature, text, or document information to ensure that compression has not made them unreadable.
Common Online Form Image Requirements and How to Meet Them
Online application systems can have very different requirements for photographs and signatures. Competitive examination forms may specify a minimum and maximum file size, while recruitment portals may provide separate requirements for photographs, signatures, certificates, and identity documents. Educational admission forms can have another set of rules. Some systems care primarily about file size, while others require both file size and exact pixel dimensions. Because these requirements are controlled by the individual application portal, there is no universal image size that works for every form.
Photographs are often required in JPG or JPEG format because photographs compress efficiently in this format. Signatures can require different treatment because excessive compression can create blurry edges or make thin strokes disappear. Documents and certificates may also need sufficient resolution so that text remains readable. If a portal specifies a range for example, a file must be between 50KB and 100KB make sure the final file is not below the minimum. Similarly, if it says “maximum 100KB,” a file of 101KB may be rejected even if the difference seems insignificant.
Another important factor is image dimensions. A file can be within the correct KB range but still be rejected if its width and height are incorrect. Conversely, an image may have the correct dimensions but exceed the file-size limit. This is why simply searching for “compress photo” is not always enough. You need to satisfy all requirements simultaneously: file format, file size, dimensions, orientation, and image content. Before uploading, create a quick checklist based on the application's official instructions and verify every item.
How to Reduce Photo Size for Government Exam and Job Application Forms
Government examinations, recruitment applications, scholarship portals, and other official forms frequently ask applicants to upload photographs and signatures within specific size limits. Applicants may encounter instructions such as a photograph below a certain KB value, a signature within another range, or a specific pixel dimension. These requirements are particularly important because an upload error can prevent an application from being completed. If the deadline is approaching, repeatedly trying random compression settings can waste valuable time.
A safer approach is to prepare a clean original photograph first. Use a properly cropped photograph with a suitable background and make sure the face is clearly visible. Then resize the photograph according to the dimensions stated by the application and compress it to the specified file-size range. Save the optimized version separately instead of overwriting your original photograph.
Always verify the final file before submitting the form. Check whether the filename has an acceptable extension, whether the file opens normally, whether the photograph remains clear, and whether its size falls within the required range. If an application specifies a maximum size, leave a reasonable margin instead of targeting the limit exactly. For important applications, keep both the original image and the final optimized copy. This makes it easier to create another version if the next application requires a different size.
JPG, JPEG, PNG, and WebP: Which Format Is Best for Online Forms?
JPG and JPEG are effectively the same image format and are widely used for photographs. They are particularly useful when the goal is to reduce the size of a photographic image because they can store complex color information relatively efficiently. When a form accepts JPG or JPEG, this is often a practical choice for passport-style photographs. The exact amount of compression required depends on the image's dimensions, colors, detail, and quality settings.
PNG uses a different compression approach and is especially useful for images with transparency, flat colors, logos, screenshots, and certain graphics. However, converting a normal photograph from JPG to PNG does not necessarily make it smaller. In many cases, the PNG version can be larger. WebP can provide excellent compression and is useful for websites because it can offer smaller files at good quality, but not every online form accepts WebP. A website may support WebP while an application portal accepts only JPG or JPEG.
Therefore, the “smallest” format is not automatically the correct format. The application instructions should always come first. If the portal accepts only JPG, use JPG. If it accepts PNG and the uploaded content benefits from PNG, it can be considered. If WebP is not listed as an accepted format, do not upload it simply because it is a modern format. For compatibility with online application portals, JPG/JPEG remains a particularly useful choice for ordinary photographs.
Why Your Image Is Still Too Large After Compression
Sometimes users compress an image but discover that the file size has barely changed. This can happen when the original image has already been compressed, when the dimensions are extremely large, or when the compression settings are not aggressive enough. A 3000 × 4000 pixel photograph contains far more pixels than a small online form generally needs. In such cases, compression alone may not be sufficient. Resizing the image can remove unnecessary pixel data and make further compression much more effective.
Another reason is the image format. A PNG photograph may be considerably larger than a JPG photograph. If the application permits JPG, converting the photograph to an appropriately compressed JPG may produce a much smaller file. However, format conversion should be performed carefully because repeated conversions can reduce quality. Ideally, work from the original image rather than repeatedly converting an already compressed file.
It is also possible that the form has a minimum size rather than only a maximum size. For example, if the required range is 20KB–50KB and your optimized image is 15KB, making it smaller is actually the wrong direction. In this situation, you may need to increase the quality or dimensions slightly until the image falls within the accepted range. This is an important distinction: successful image optimization means meeting the application's complete requirements, not simply producing the smallest possible file.
How to Reduce Image Size on Mobile for Online Forms
Many people complete government, education, employment, and scholarship applications directly from smartphones. Modern phone cameras create high-resolution photographs that can easily be several megabytes. Uploading the original camera image may therefore result in a “file too large” message. The simplest solution is to create an optimized copy before uploading. Depending on the phone and available tools, you can crop, resize, compress, and save a smaller version of the photograph.
When working on Android or iPhone, avoid repeatedly sending the photograph through messaging applications simply to reduce its size. Messaging services may apply unpredictable compression and can sometimes alter the image in ways that are not suitable for official applications. Instead, use a dedicated image resizing or compression method where you can verify the resulting dimensions and file size. This gives you much greater control over whether the final image meets the application's requirements.
If you are completing an important form on mobile, verify the optimized file before opening the application portal. Check the image size in your file manager or image tool and confirm that the extension is correct. If the requirement is 50KB or less, do not assume that a file that “looks small” is actually below 50KB. File size must be measured in KB. Similarly, if the requirement specifies a minimum, confirm that the image has not been compressed below that threshold.
Best Practices for Reducing Image Size for Online Applications
The first best practice is to always keep an untouched original. Your original photograph may be useful for future applications, printing, identification, or other purposes. Create optimized copies for individual forms rather than permanently reducing the original. Different portals can have completely different requirements, so having the original allows you to generate a new version whenever necessary.
The second best practice is to follow the official instructions exactly. Do not rely on a generic image-size recommendation from another website if the application portal provides its own requirements. The official instructions may specify the file format, maximum size, minimum size, dimensions, background, aspect ratio, or naming convention. Treat those requirements as the source of truth. An image that works for one examination or job application may fail on another.
The third best practice is to verify the result before submission. A good final check should include the file extension, file size in KB, image dimensions, image orientation, visual clarity, and whether important information remains readable. If the image is a photograph, check the face. If it is a signature, check that the strokes are visible. If it is a document, make sure the text can still be read. Spending one minute checking the optimized file can prevent much greater frustration during final form submission.
Can You Reduce Image Size Without Changing Dimensions?
Yes, it is possible to reduce image file size without changing its pixel dimensions. In this case, the primary technique is compression or optimization. Image data can often be stored more efficiently without altering the width and height. This approach can be useful when an online form explicitly requires particular dimensions but your file is too large.
However, there is a practical limit to how much you can reduce a file without changing dimensions or noticeably affecting quality. If the photograph is extremely large, reducing only compression quality may eventually make the image visibly degraded. When the application's dimension requirement allows flexibility, reducing the pixel dimensions can often provide a better quality-to-size balance.
If the dimensions are mandatory, use the highest compression level that still produces an acceptable image. For official forms, do not prioritize a tiny file over readability. A very aggressive compression setting might technically satisfy the KB requirement but make the face, signature, or document text difficult to recognize. The correct target is the smallest acceptable file that remains visually usable and complies with the portal's rules.
Online Image Compressor vs. Manual Image Editing
Manual editing applications such as image editors can resize and export images, but they can require several steps and technical knowledge. You may need to determine the correct dimensions, choose an export format, adjust quality, save the file, inspect its size, and repeat the process. This is manageable for experienced users but can be inconvenient when an application requires a very specific KB range.
An online image compressor can simplify the process by bringing resizing and compression into a single workflow. The user can upload an image, optimize it, and verify the resulting file. A particularly useful tool is one that supports a target file size, because the user can specify a requirement such as 50KB or 100KB instead of repeatedly guessing compression settings.
Privacy should also be considered when using online tools. Avoid uploading highly sensitive documents to an unfamiliar website. Look for clear information about how uploaded files are processed, whether files are automatically deleted, and whether processing happens locally in the browser when appropriate. For ordinary application photographs, a reputable tool with transparent privacy practices can make the process considerably easier.
Common Mistakes When Reducing Image Size for Online Forms
One of the most common mistakes is assuming that smaller always means better. If an application requires a photograph between 50KB and 100KB, reducing it to 15KB does not meet the requirement. Another common mistake is ignoring image dimensions. A photograph can have the correct file size while still being rejected because its pixel dimensions or aspect ratio are incorrect.
Another mistake is repeatedly compressing the same image. Every lossy export can potentially remove additional image information. If you compress, save, reopen, compress again, and repeat the process, the image may gradually lose quality. It is better to return to the original file and create a fresh optimized version whenever you need different settings.
Finally, many users forget to verify the actual downloaded file. They may upload the original photograph by mistake because both files have similar names. Use descriptive filenames such as photo-50kb.jpg or signature-100kb.jpg when appropriate, while still following any naming rules specified by the application. Before uploading, check the file's actual properties rather than relying on its filename. A file named “50kb” does not guarantee that it is 50KB.
Frequently Asked Questions About Reducing Image Size in KB
How can I reduce image size in KB for an online form?
You can reduce image size by resizing the image to the required dimensions and compressing it using a suitable image compression tool. First check the application's required KB range, format, and dimensions. Then create an optimized copy and verify its final file size before uploading.
How do I reduce a photo to 50KB?
Start with the original photograph, resize it if its dimensions are unnecessarily large, and then compress it as a JPG if the application accepts JPG. Check the resulting file size and adjust the dimensions or compression level until it falls within the required range.
How can I make an image less than 100KB?
Resize the image if necessary and compress it using an appropriate quality setting. If the application says “maximum 100KB,” aim somewhat below the limit rather than exactly at 100KB. Always verify the final file size before uploading.
How do I reduce an image to 20KB?
Reaching 20KB may require both resizing and stronger compression, especially if the original photograph is very large. If the form requires a range such as 20KB–50KB, make sure the final file does not fall below the minimum.
Can I reduce image size without losing quality?
You can significantly reduce file size while maintaining good visual quality, but there is no guarantee that quality will remain completely unchanged at very small file sizes. Resizing unnecessary dimensions and using appropriate compression usually provides a good balance between size and quality.
Which image format is best for online forms?
For photographs, JPG or JPEG is often a practical option because it provides efficient compression. However, the best format is ultimately the one specified or accepted by the application portal. Do not upload WebP or another format if the form only accepts JPG or PNG.
Why is my image still too large after compression?
The image may have very large pixel dimensions, an inefficient format, or insufficient compression. Try resizing the image before compressing it. Also check whether you are using PNG for a photograph when the form permits JPG.
Can I reduce image size without changing the dimensions?
Yes. Compression and image optimization can reduce the file size while keeping the same pixel dimensions. However, there is a limit to how much you can reduce a file without affecting quality. If the form allows different dimensions, resizing can provide a better result.
Why does an online form reject my image even though the KB size is correct?
The form may also check file format, pixel dimensions, aspect ratio, image orientation, or other requirements. Review the application's complete image instructions instead of checking only the file size.
Should I compress the original photo?
It is better to keep the original photograph unchanged and create a separate compressed copy. This preserves a high-quality source that you can use to create other versions for applications with different requirements.
Is JPG the same as JPEG?
Yes. JPG and JPEG refer to the same basic image format. The different extensions originated from historical filename limitations, but modern systems generally treat them as equivalent.
How do I know whether my image is actually below the required KB limit?
Check the file properties on your computer or use an image tool that displays the final file size. Do not rely on the filename or visual appearance. If the form specifies a range, compare the measured file size with both the minimum and maximum values.
Conclusion: The Right Way to Reduce Image Size in KB for Online Forms
Knowing how to reduce image size in KB for online forms can save time and prevent unnecessary upload errors. The most important point is that successful image optimization is not simply about making a photograph as small as possible. You need to meet the application's complete requirements, including the minimum or maximum KB size, accepted file format, image dimensions, and visual quality.
The most reliable workflow is simple: check the official application requirements, keep your original image safe, resize unnecessary dimensions when permitted, compress the image using an appropriate format, and verify the final file before uploading it. For photographs, JPG/JPEG is often a useful choice when supported. For extremely small requirements such as 20KB or 50KB, resizing and compression may need to be combined.
Whether you are submitting a government exam application, job application, college admission form, scholarship application, passport-related document, or another online application, preparing the correct image before starting the final submission can make the process much easier. Instead of repeatedly guessing compression settings, use a reliable image resizing and compression workflow that lets you verify the final KB size and image quality. Most importantly, always follow the specific instructions provided by the application portal because requirements can vary significantly from one form to another.
Reader Comments (0)