How to Reduce Image Size from MB to KB:Compress Images Without Losing Quality
P
Pushpam AbhishekFounder & Lead Developer
📅 Published: Sep 20, 2026
⏱️ 18 min read
👁️ 27 views
Reduce Image Size from MB to KB
Large image files can quickly become a problem when you need to upload photographs to websites, online forms, email, social media, applications, or document portals.
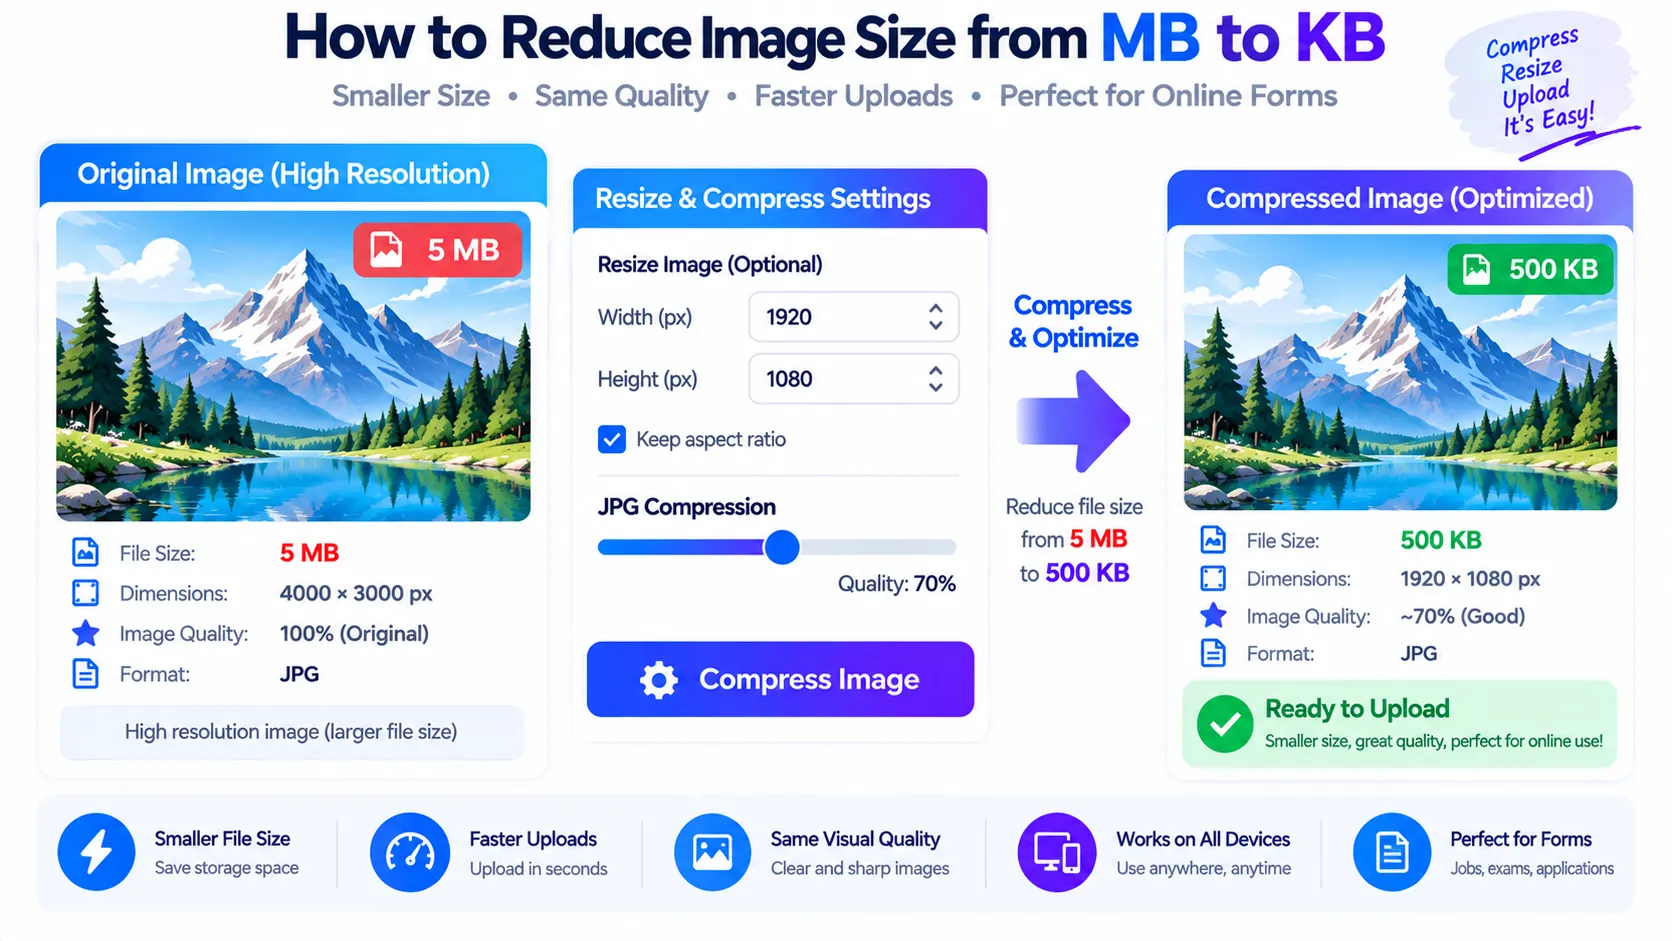
A photo that is 2MB, 5MB, or even 10MB may exceed the platform's file size limit, upload slowly, or consume unnecessary storage. Learning how to reduce image size from MB to KB can help you create smaller files while keeping the image clear and usable.
The most effective approach usually combines resizing, cropping, format selection, and compression. In this guide, you will learn why images become large, how MB and KB relate to image dimensions and quality.
How to Reduce Image Size from MB to KB Online
The simple way to reduce an image from MB to KB is to use an image compression and resizing tool. These tools process the image and remove unnecessary data while maintaining as much visual quality as possible.
A typical workflow starts by selecting the original photograph, choosing the desired output format, adjusting the dimensions if necessary, and applying compression.
Before compressing an image, check the requirements of the website where you plan to upload it. Some platforms specify only a maximum file size, while others require particular dimensions, formats, aspect ratios, or minimum file sizes.
Why Image Files Are Large and How MB Becomes KB
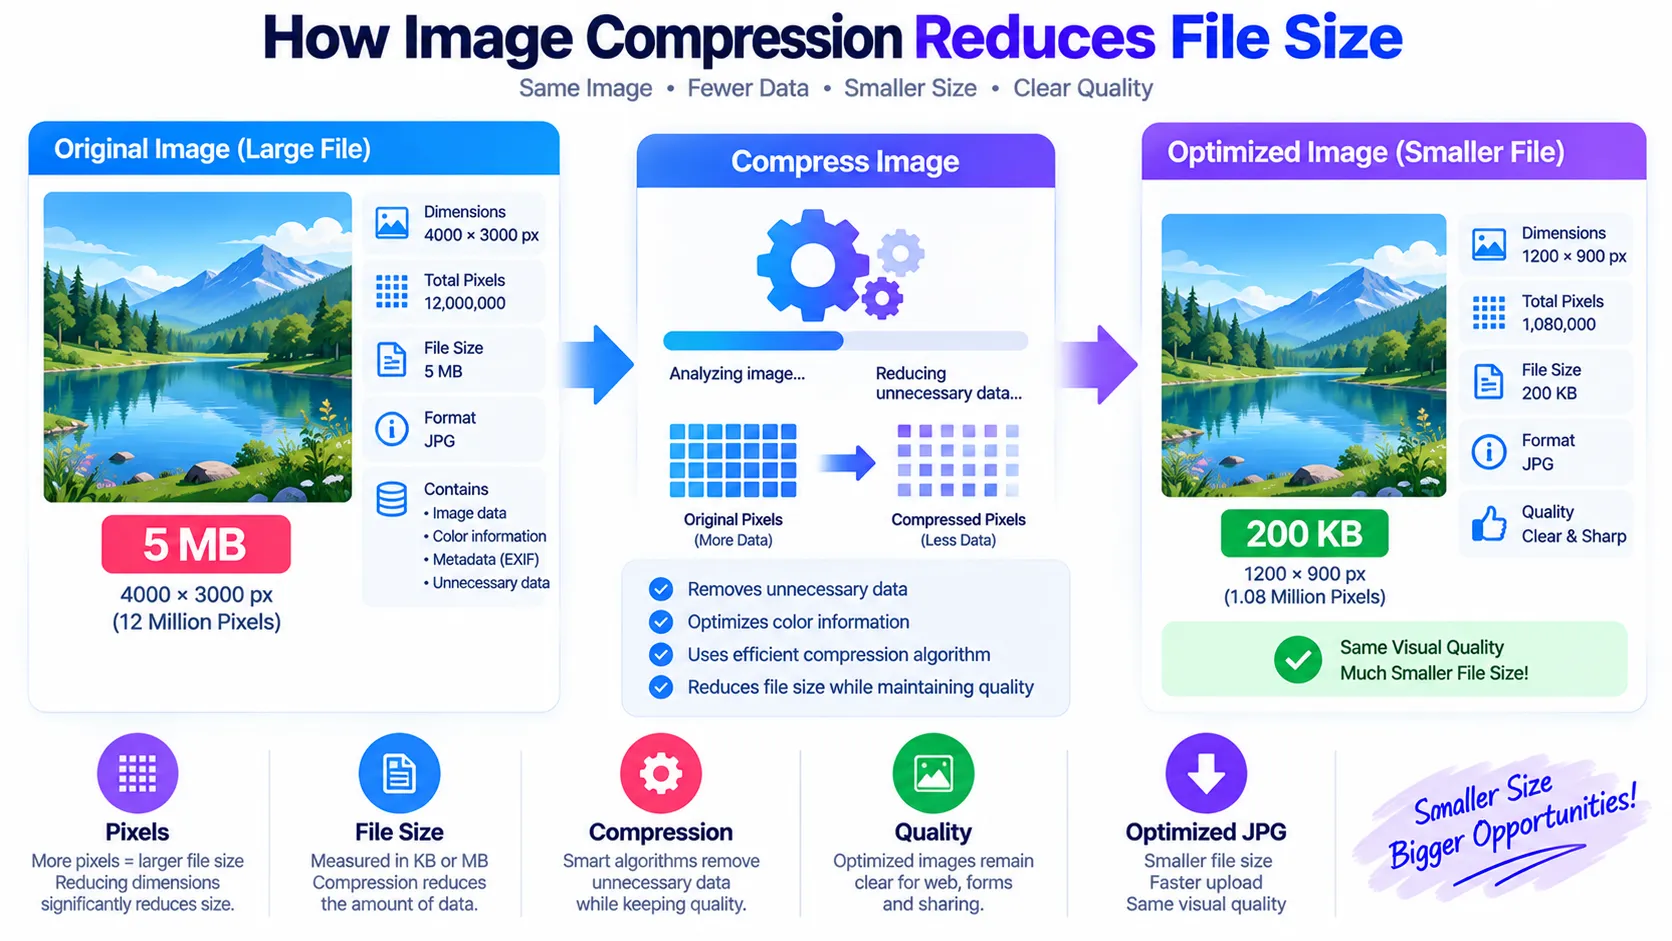
Image file size is influenced by several factors, including pixel dimensions, image format, compression level, color information, metadata, and the complexity of the photograph.
Reduce Photo Size A single photograph may contain millions of pixels, producing a file that is several megabytes in size. While this resolution is useful for printing or detailed editing, it is often unnecessary for websites and online forms. A smaller image with appropriate dimensions can look almost identical on a screen while occupying a fraction of the storage space.
The difference between MB and KB is primarily a difference in digital storage size. In everyday computing, people commonly use approximately 1MB = 1,024KB, although decimal units are also widely used by software and storage providers.
Therefore, converting an image from 5MB to 500KB represents a substantial reduction in stored data.
Best Ways to Reduce Image Size from MB to KB
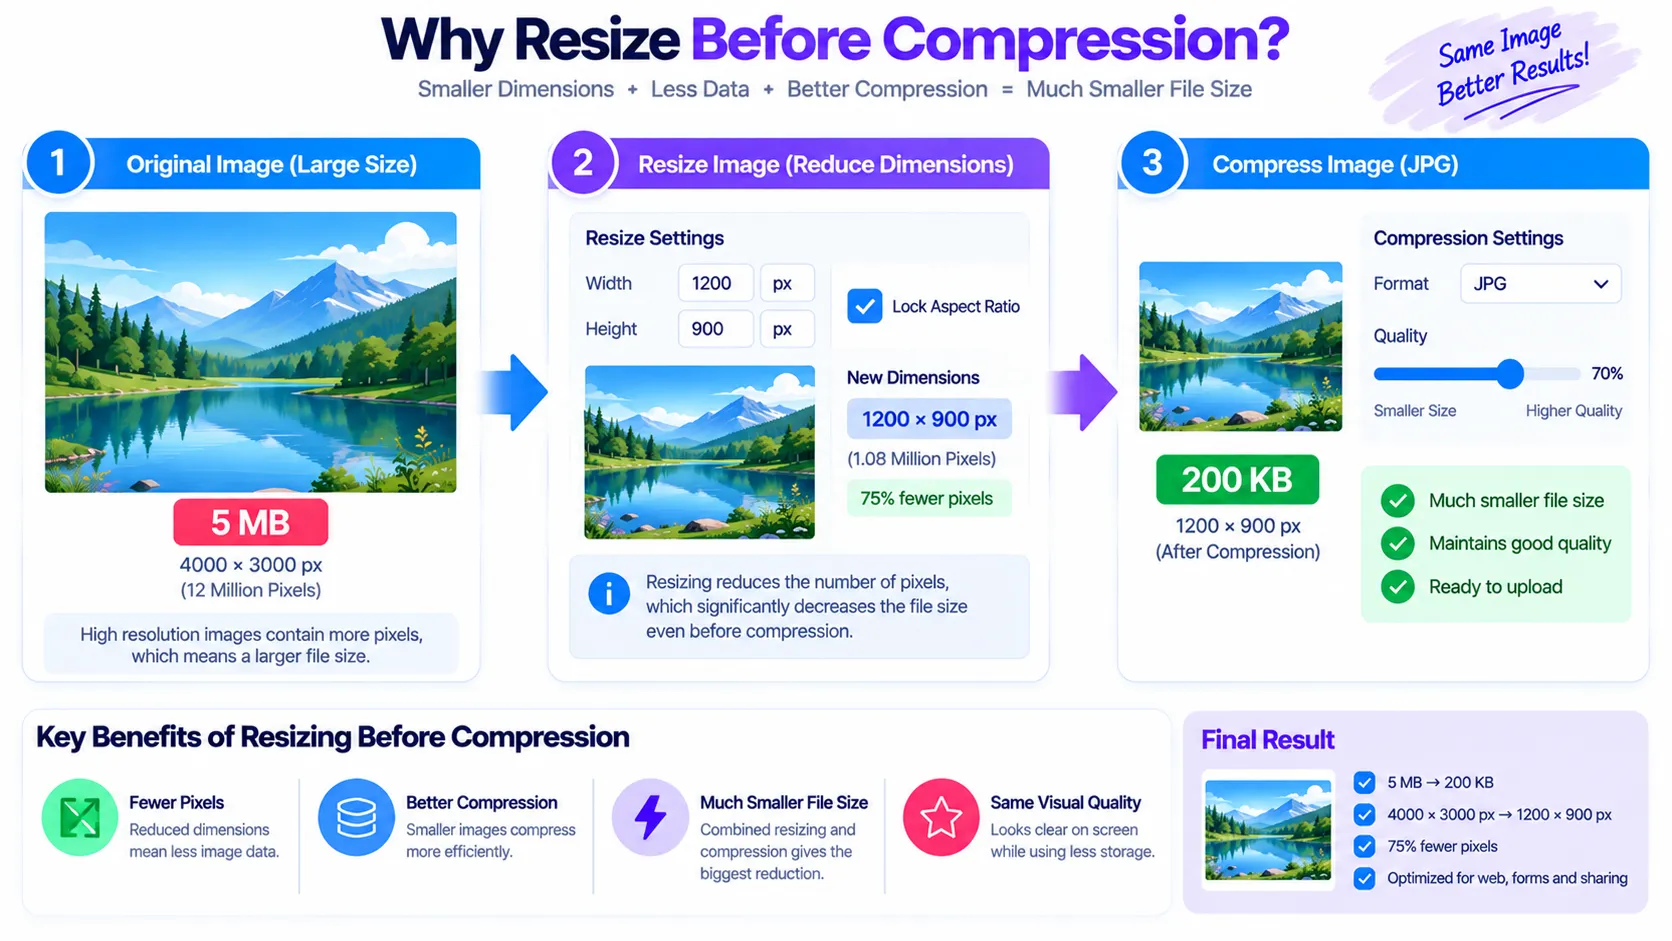
One of the most effective techniques is image resizing. Consider a photograph that is 4000 × 3000 pixels. If the image is intended only for a small online upload, keeping all 12 million pixels may be unnecessary. Reducing the dimensions to a suitable size dramatically decreases the amount of visual information that must be stored.
The second major technique is image compression. JPG is particularly effective for photographs because its compression algorithm is designed to reduce visual data efficiently.
A high-quality JPG can often be reduced substantially while remaining visually clear. However, stronger compression produces smaller files at the cost of more visible artifacts.
The goal should therefore be controlled compression rather than maximum compression. If an image needs to be reduced from several megabytes to a few hundred kilobytes, combining resizing and moderate JPG compression usually produces better results than simply lowering JPG quality to an extreme level.
The third technique is choosing the appropriate image format. JPG is generally well suited to photographs, while PNG is often preferable for graphics requiring transparency, sharp text, or lossless compression. WebP and AVIF can provide highly efficient compression for websites when supported by the destination platform. However, format compatibility matters.
How to Reduce Photo Size from MB to KB Without Losing Quality
When people search for how to reduce image size from MB to KB without losing quality, they are usually looking for a balance between file size and visual clarity. Technically, lossy compression changes the image, so completely eliminating quality loss is not always possible.
However, the visible difference can often be minimized. The first step is to use the original image rather than repeatedly compressing an already compressed copy. Starting from the original gives the compression process more information to work with and avoids cumulative degradation.
Next, resize the photograph according to its actual purpose. A high-resolution camera image may be perfect for printing but unnecessarily large for an online form. If the form displays a small photograph, reducing the pixel dimensions can remove a substantial amount of data without producing an obvious quality problem.
For example, reducing a very large image to an appropriate web or application resolution can often produce a greater size reduction than simply changing the JPG quality slider.
After resizing, apply compression gradually and inspect the result. Look for blocky areas, halos around edges, excessive blur, color banding, and loss of important details. For photographs, pay particular attention to faces and fine features. For screenshots and documents, inspect text and sharp lines. If the output looks too degraded, increase the quality setting or allow a slightly larger file size. A good compressed image is not necessarily the smallest possible file; it is the smallest file that still satisfies the purpose and technical requirements.
How to Reduce Image Size for Online Forms and Applications
Online applications frequently impose strict image requirements because smaller files are faster to upload and easier for servers to process. Recruitment applications, examination forms, scholarship portals, admission forms, government services, registration websites, and document-upload systems may all specify maximum file sizes. Some forms may ask for photographs in KB, signatures in KB, and supporting documents in MB. Before editing an image, carefully read the upload instructions and record the required format, maximum file size, dimensions, and aspect ratio.
If an application requires a photograph below a specific threshold, use a target-size workflow. Start with the original photograph, crop it to the required composition, resize it to the specified dimensions, and save it in the required format. Then compress it until the file falls within the permitted size. For example, if the requirement is “JPG, maximum 100KB,” a file of 80KB may be suitable if all other requirements are satisfied.
Always verify the final image before uploading it. Check the actual file extension, file size, pixel dimensions, and visual quality. A file can have the correct size but still be rejected because its dimensions are incorrect. Similarly, renaming a PNG file to “.jpg” does not actually convert it to JPG. The image must be properly exported or encoded in the required format.
How to Reduce JPG Image Size from MB to KB
JPG is one of the most commonly used formats for reducing photograph file sizes. Its compression system removes certain visual information that is considered less important to human perception. This makes JPG highly efficient for photographs containing gradients, colors, textures, and natural scenes. When reducing a JPG from MB to KB, start by determining whether the image dimensions are larger than necessary. If they are, resize the image first and then adjust compression.
Compress Image
JPG quality is commonly represented by a quality percentage or a slider, but the same percentage does not guarantee the same file size for every image. A photograph containing a plain background may become much smaller than a photograph containing foliage, buildings, hair, or other complex details at the same quality setting. Therefore, do not assume that “70% quality” will always produce a particular KB value. Instead, process the image and check the actual resulting file size.
If the image is still too large, reduce the dimensions or increase compression in small steps. If it becomes much smaller than required and quality has visibly deteriorated, increase the quality setting. The best result is usually found through controlled adjustments rather than one extreme compression operation. For online forms, the final output should meet both the file-size requirement and the visual requirements of the application.
How Image Resolution Affects File Size
Resolution and file size are closely related, although they are not exactly the same thing. Resolution generally refers to the number of pixels in an image, such as 1920 × 1080 or 4000 × 3000. More pixels provide more potential detail, but they also create more information that must be stored. A photograph with millions of pixels can therefore be significantly larger than a smaller version of the same image, even when both are saved in the same JPG format.
Reducing resolution can be one of the most efficient ways to move from MB to KB. However, the correct dimensions depend on the intended use. An image intended for a small online profile does not need the same resolution as an image intended for a large printed poster. Similarly, an examination form may specify exact photo dimensions that must be followed. Never reduce an image below a required minimum simply to achieve a smaller file size.
When resizing, maintain the original aspect ratio whenever possible. For example, if an image has a 4:3 ratio, reducing its width should automatically reduce its height proportionally. If you need a specific aspect ratio, crop the image first and then resize it. This produces a more natural result than stretching or squeezing the photograph.
How to Reduce Image Size from 5MB, 2MB or 1MB to KB
A multi-megabyte photograph can often be reduced considerably by combining resizing and compression. If you have a 5MB image and need a 500KB version, reducing the dimensions and applying moderate JPG compression may be enough. If you need a 100KB or 50KB version, substantially more optimization may be necessary. The exact amount of reduction depends on the original dimensions, image content, format, and desired quality.
For a 2MB image, begin by checking whether its dimensions are unnecessarily high. A smartphone photograph may contain far more pixels than an online application needs. Resize it to an appropriate dimension and export it as JPG if JPG is accepted. Then check the resulting file size. If it is still above the target, apply additional compression. This approach preserves more useful visual information than simply applying extremely low JPG quality to the original high-resolution file.
A 1MB image may require only moderate optimization to reach several hundred KB. If the target is particularly small, such as 20KB or 50KB, you may need to reduce both dimensions and quality more aggressively. At very small file sizes, some visible quality reduction is inevitable. The correct balance depends on whether the image is a photograph, signature, document, screenshot, or another type of visual content.
Step-by-Step Guide to Reduce Image Size from MB to KB
Reduce Image Size
Step 1: Check the required file size. Determine whether the destination requires a maximum or a specific range, such as below 100KB or between 50KB and 200KB.
Step 2: Check the required format. Confirm whether the destination accepts JPG, JPEG, PNG, WebP, or another format. Do not assume that a smaller format will be accepted.
Step 3: Check image dimensions. Look for required width, height, or aspect ratio specifications. These requirements should be known before resizing.
Step 4: Make a copy of the original. Keep the original photograph untouched. Work on a duplicate so that you can create another version later.
Step 5: Crop unnecessary areas. Remove irrelevant parts of the photograph while maintaining the required composition.
Step 6: Resize the image. Reduce the pixel dimensions to a level appropriate for the destination.
Step 7: Select the correct format. For photographs, JPG is often an efficient choice when supported by the destination.
Step 8: Compress the image. Start with moderate compression and check the resulting file size.
Step 9: Fine-tune the result. If the image is still too large, increase compression or reduce dimensions when permitted. If it is unnecessarily small or blurry, use a higher quality setting.
Step 10: Verify everything. Check the final KB/MB size, format, dimensions, and image clarity before uploading.
Common Mistakes When Reducing Image Size
One of the most common mistakes is using excessive compression. People sometimes select the lowest quality setting because they believe smaller is always better. This can turn a clear photograph into a blurry or pixelated image. Another mistake is ignoring dimensions. A photograph can have a small file size but still fail an upload requirement because its pixel dimensions are outside the permitted range.
Another frequent mistake is repeatedly saving an already compressed JPG. Because JPG compression is generally lossy, repeatedly processing the same file can gradually introduce artifacts. It is better to keep the original image and create a fresh compressed copy whenever you need a different target size. This is particularly important when creating multiple versions, such as 50KB, 100KB, and 200KB copies of the same photograph.
Users also sometimes confuse file extension with file format. Changing “image.png” to “image.jpg” in the filename does not convert the actual image encoding. The file must be exported or converted properly. Finally, do not rely only on the displayed preview of a compression tool. Always verify the actual downloaded file's properties before submitting it to an online application.
How to Reduce Image Size on Mobile and Computer
You can reduce image size on both smartphones and computers. On a mobile device, a browser-based image compressor can be convenient because it avoids installing dedicated software. Select the photograph, resize it if necessary, choose the output format, compress it, and download the optimized copy. This approach is particularly useful when a photograph needs to be uploaded directly from a phone to an online form.
On a computer, you have additional options, including built-in image editors, dedicated compression applications, and browser-based tools. Desktop workflows can be useful when processing multiple images or when you need more precise control over dimensions and quality. Regardless of the device, the principles remain the same: identify the requirements, resize appropriately, choose the correct format, compress carefully, and verify the output.
For sensitive documents or personal photographs, consider whether the compression method processes files locally in the browser or uploads them to a remote server. Browser-based local processing can be useful when privacy is important because the original image does not necessarily need to leave the device. Always review the privacy information of a service before uploading sensitive documents or personal identification photographs.
MB to KB Image Compression: Quality vs File Size
Image optimization is essentially a balance between quality and file size. Increasing quality usually produces a larger file, while stronger compression generally creates a smaller file. Increasing image dimensions can also increase file size, while reducing dimensions can decrease it. There is therefore no single compression setting that works for every image.
The best target is the smallest file that still meets the purpose of the image. If an application accepts files up to 200KB, there may be no practical advantage in forcing a clear photograph down to 30KB. On the other hand, if the application requires a maximum of 50KB, a 150KB file will not satisfy the technical requirement regardless of how clear it looks.
For this reason, image compression should be treated as an optimization process rather than a race toward the smallest possible file. Check the requirements, make the appropriate changes, inspect the result, and adjust only as much as necessary. This approach helps preserve image clarity while still achieving substantial reductions in file size.
Frequently Asked Questions About Reducing Image Size from MB to KB
How do I reduce image size from MB to KB?
You can reduce an image from MB to KB by resizing its dimensions, choosing an efficient image format such as JPG for photographs, and applying controlled compression. For very large reductions, combining resizing and compression is usually more effective than using compression alone.
How can I reduce a 5MB photo to 500KB?
Start by checking whether the photo's dimensions are unnecessarily large. Resize it to an appropriate resolution, save it as JPG if the destination supports JPG, and apply moderate compression. Check the resulting file size and make small adjustments until it is below the required limit.
How do I reduce a 2MB image to 100KB?
Resize the image to suitable dimensions and then compress it as JPG. Because 100KB is significantly smaller than 2MB, both resizing and compression may be necessary. Always check the final dimensions and image quality as well as the file size.
Can I reduce a JPG from MB to KB without losing quality?
Some quality loss can occur with lossy JPG compression, but it can often be made visually insignificant. Using appropriate dimensions and moderate compression while starting from the original image helps preserve clarity.
Does resizing reduce image file size?
Yes. Resizing reduces the number of pixels in the image, which can substantially reduce the amount of data that needs to be stored. However, do not resize below the minimum dimensions required by the destination website.
Is JPG better than PNG for reducing photo size?
For many photographs, JPG can produce a much smaller file than PNG because JPG is designed for efficient lossy compression of photographic content. PNG can be preferable for graphics, transparency, or images where lossless quality is important.
What is the difference between MB and KB?
Both are units used to describe digital data size. In common binary usage, 1MB is 1,024KB. In decimal storage terminology, 1MB is 1,000KB. The exact convention depends on the operating system or service displaying the file size.
Why is my compressed image still too large?
The image may have very large pixel dimensions, complex visual content, unnecessary metadata, or insufficient compression. Try resizing the image first and then applying additional compression while monitoring visual quality.
Why does my image become blurry after reducing it?
The image may have been compressed too aggressively or resized to dimensions that are too small. Start from the original file and use a larger target size, higher quality setting, or larger dimensions if the destination requirements allow it.
How do I reduce image size for an online government form?
First check the application's required file format, maximum or minimum size, dimensions, and aspect ratio. Then crop and resize the photograph, save it in the required format, compress it to the permitted size, and verify the final file before uploading.
Can I reduce image size on my phone?
Yes. You can use a mobile image editor or browser-based compression tool to resize and compress photographs. The same principles apply: check requirements, resize appropriately, compress, and verify the final file.
Can I reduce multiple images at once?
Yes. Batch image compressors can process multiple photographs in one operation. Batch processing is useful when several images need the same general dimensions or compression settings, although each output should still be checked if the destination has strict requirements.
What image size is best for online forms?
There is no universal size. The correct size is determined by the specific form. Some websites may require images below 20KB, 50KB, 100KB, 200KB, or another limit. Always follow the instructions provided by the destination website.
Does changing an image filename reduce its size?
No. Changing the filename or file extension does not compress the image. Actual image processing, such as resizing, re-encoding, or compression, is required to reduce the file size.
Should I keep the original image after compression?
Yes. Keeping the original is recommended because different websites may require different dimensions or file sizes. You can create new optimized versions from the original without repeatedly degrading the same compressed file.
Conclusion
Understanding how to reduce image size from MB to KB makes it much easier to prepare photographs for websites, online applications, email, document portals, and other digital services. The most effective workflow combines several techniques rather than relying on a single compression setting. Start by checking the destination's requirements, then crop unnecessary areas, resize the image to an appropriate resolution, select the required format, and apply controlled compression.
For photographs, JPG is often an efficient choice when supported by the destination. However, the correct format depends on the application. Remember that file size, dimensions, format, and visual quality are separate requirements.
A file can be small but still fail because its dimensions are wrong, while a perfectly clear photograph can be rejected because it exceeds the maximum KB limit.
The most reliable approach is therefore simple: check the requirements → crop → resize → choose the correct format → compress → verify → upload.
By following this process, you can turn large MB-sized photographs into practical KB-sized images while preserving as much useful quality as possible. Whether you need to reduce a 5MB photo to 500KB, a 2MB image to 100KB, or a photograph to a much smaller target such as 50KB or 20KB, controlled resizing and compression provide the foundation for successful image optimization.
Share this guide
P
Pushpam Abhishek
Founder & Lead Developer · ReducerImage
Founder of ReducerImage based in Muzaffarpur, Bihar. Architect of the 100% client-side privacy-first image compression and format optimization engine with zero cloud uploads.


Reader Comments (0)