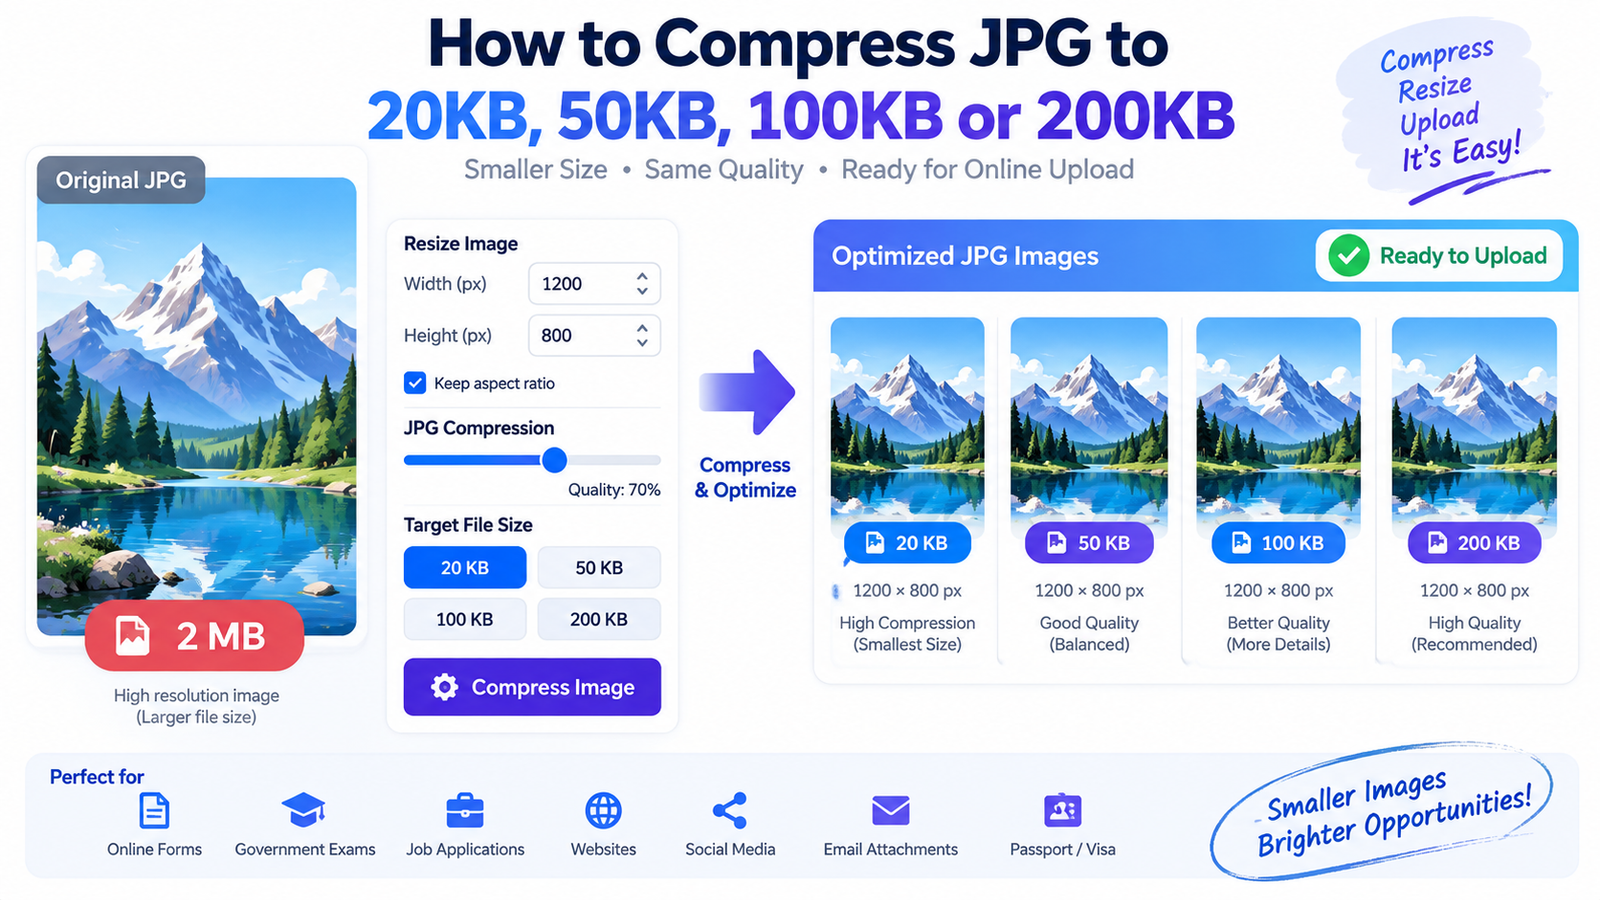
Many online applications require photographs and scanned documents to meet strict file-size limits. A form may accept an image only if it is below 20KB, 50KB, 100KB, or 200KB. If your JPG is several hundred kilobytes or a few megabytes, uploading it can result in an error.
Fortunately, you can reduce its file size by resizing the image, adjusting JPG compression, removing unnecessary image data, and selecting appropriate dimensions. This complete guide explains how to compress JPG to 20KB, 50KB, 100KB or 200KB while keeping the image readable and visually clear. You will also learn which settings to use, why image dimensions matter, how to avoid excessive quality loss, and how to prepare photographs for online forms.
How to Compress JPG Images to a Specific File Size
When an application specifies a maximum file size such as 20KB, 50KB, 100KB, or 200KB, simply choosing a generic “compress image” option may not be enough. Standard JPG compression usually reduces the file size by a percentage, while an online application often requires you to meet a specific target.
compress in kb
For example, an examination form might accept a photograph between 20KB and 50KB, while another application may require a signature below 100KB. The easiest approach is to combine image resizing with JPG compression. First, reduce unnecessary dimensions, then adjust the JPG quality until the resulting file falls within the required range.
.A photograph measuring 4000 × 3000 pixels can contain far more information than an online application needs. If the form requires a small passport-style photograph, maintaining the original resolution is often unnecessary.
How to Reduce JPG Size to 20KB, 50KB, 100KB and 200KB
The target size determines how aggressively an image needs to be processed. A 20KB JPG requires considerably more compression than a 200KB JPG, especially when the original image is a high-resolution photograph. For a 20KB target, you may need to reduce both the image dimensions and JPG quality. For 50KB, moderate resizing combined with compression can often produce a clearer result. A 100KB or 200KB target gives you more room to preserve detail, making these sizes suitable when the application accepts larger images. The exact settings depend on the original image, its dimensions, colors, background, and amount of detail.
Compress JPG to 20KB
A useful workflow is to create a copy of the original image and work on that copy. Resize the image according to the application's required dimensions, select JPG as the output format, and begin with moderate compression. Check the resulting file size. If it is still larger than the required limit, reduce the dimensions slightly or increase compression.
How to Compress JPG to 20KB Without Losing Too Much Quality
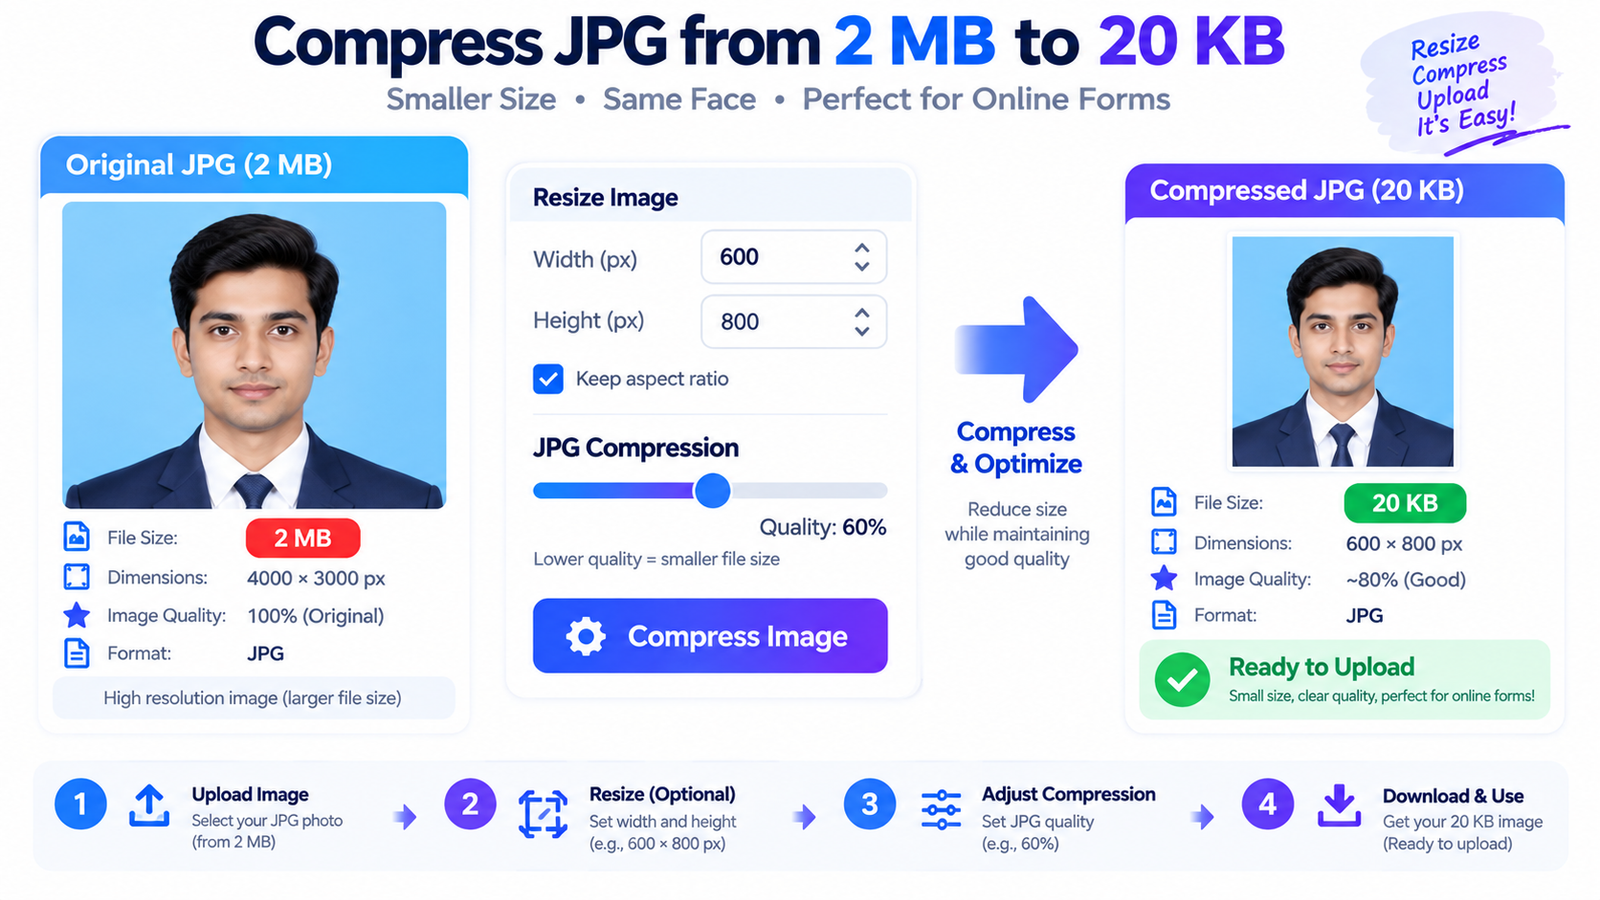
Compressing a JPG to 20KB is one of the more challenging image-optimization tasks because 20KB provides very little storage space for photographic information. If you start with a multi-megapixel photograph, trying to reach 20KB using quality reduction alone can create visible artifacts, blockiness, blurred edges, and loss of facial detail. A better strategy is to resize the photograph first. For a passport-style image, determine the dimensions requested by the application and use those dimensions as the starting point. Removing unnecessary pixels reduces the amount of information that must be stored and allows the remaining pixels to retain better quality.
After resizing, convert or save the image as JPG if the application accepts JPG. JPG is particularly useful for photographs because it uses lossy compression to reduce file size efficiently. Adjust the quality gradually rather than immediately choosing the lowest possible quality. If the result is slightly above 20KB, make a small adjustment and process it again. You should also avoid repeatedly opening and saving the same compressed JPG because every lossy re-encoding operation can introduce additional degradation. Keep the original image untouched and create the final 20KB version from the original whenever you need to make changes.
How to Compress JPG to 50KB, 100KB or 200KB Online
For targets such as 50KB, 100KB, or 200KB, browser-based JPG compression can be a convenient option because you do not necessarily need professional image-editing software. A typical workflow involves selecting the JPG, choosing a target file size or compression level, optionally changing the dimensions, and generating the optimized image. A useful compressor should provide a clear indication of the original and resulting file sizes so that you can verify whether the output meets your application's requirements. If the tool offers a target-size mode, you can enter a desired value such as 50KB, 100KB, or 200KB and then fine-tune the result if necessary.
When preparing an image for an online application, do not focus exclusively on the file-size number. A technically small image can still be unsuitable if the photograph becomes too blurry, the signature becomes difficult to read, or important details disappear. The ideal result is the smallest file that still satisfies the application's visual and technical requirements. For example, a 200KB photograph may retain substantially more detail than a 20KB photograph, but if the form specifically limits the photograph to 50KB, the 200KB version will not be useful. Your target should therefore be based on the actual upload instructions rather than a generic recommendation.
Different types of images also behave differently during compression. A portrait photograph with a simple background may compress efficiently, while an image containing text, intricate patterns, foliage, or many sharp edges may require more data to remain clear. Signatures can also behave differently from photographs because thin strokes and high-contrast edges can become distorted when compressed aggressively. For signatures and scanned documents, it is particularly important to inspect the output at normal viewing size. If letters or signature strokes become difficult to distinguish, use a slightly larger file size when the application permits it.
Best JPG Compression Settings for Government Forms and Online Applications
Government forms, examination applications, recruitment portals, scholarship applications, admission forms, and other online services frequently specify image requirements. These requirements may include a maximum file size, minimum file size, exact dimensions, aspect ratio, file format, and sometimes a particular photograph background. Before compressing an image, collect all of these requirements. For example, if a portal requires a JPG between 20KB and 50KB with particular dimensions, creating a 15KB image simply because it is smaller does not necessarily solve the problem. Likewise, an image that is 40KB but has incorrect dimensions can still be rejected.
For a photograph, start with the required aspect ratio and dimensions whenever those specifications are available. Cropping and resizing should happen before final compression. This prevents you from spending time compressing pixels that will eventually be removed. After resizing, choose JPG and adjust the compression level. For a target of 20KB, stronger compression may be necessary. For 50KB, 100KB, or 200KB, you can generally use progressively less aggressive compression, depending on the original image. The best settings cannot be determined from file size alone because the content of each photograph affects the resulting JPG.
20KB vs 50KB vs 100KB vs 200KB: Which JPG Size Should You Use?
The correct target depends entirely on the requirements of the website or application where the image will be uploaded. A 20KB image is appropriate when a portal explicitly sets a very small limit. A 50KB image provides more room for photographic detail while still producing a lightweight file. A 100KB image can preserve additional detail and may be suitable for applications that specify a larger limit. A 200KB JPG generally allows even more visual information to remain, but it should only be used when the website permits that size. There is no universal “best” JPG file size for every online form.
Consider the relationship between file size, dimensions, and image quality. These three factors influence one another. Increasing dimensions generally increases the amount of information in the image, while increasing JPG quality usually increases the resulting file size. Reducing dimensions and quality generally produces a smaller file. Therefore, if you need to reach a very small target such as 20KB, changing both dimensions and compression may be more effective than dramatically lowering quality alone. Conversely, if the image already has appropriate dimensions but is only slightly above a 200KB limit, a modest compression adjustment may be enough.
A practical way to think about the four common targets is to use the smallest size that satisfies the application's requirements without unnecessarily damaging the image. For example, if the permitted range is 20KB–100KB, there is no reason to force the photograph down to exactly 20KB if a clearer 70KB version is accepted. If the maximum is 50KB, however, a 70KB file is not suitable even if it looks better. Always prioritize the actual specifications of the upload portal. The goal is not simply to make the file as small as possible; it is to make the file small enough while preserving the quality and dimensions required for successful submission.
How Image Dimensions Affect JPG File Size
Image dimensions have a major effect on JPG file size. A photograph's dimensions are usually expressed as width × height in pixels. For example, 4000 × 3000 pixels contains vastly more pixels than 800 × 600 pixels. Even when both images show the same scene, the larger image generally requires more information to store. Resizing an image therefore provides one of the most effective ways to reduce its file size before applying JPG compression.
However, reducing dimensions too aggressively can make an image unsuitable for an application. If a portal requires a photograph with specific pixel dimensions, those instructions should take priority. If no exact dimensions are given, choose dimensions appropriate for the intended use rather than reducing the image until it becomes tiny. For a small online form preview, an enormous 4000-pixel-wide photograph is usually unnecessary, but the appropriate size depends on the website's specifications. The objective is to remove unnecessary resolution while keeping enough detail for the intended purpose.
Resizing should also preserve the image's aspect ratio unless the application explicitly requires a different ratio. Stretching a photograph can make the face appear wider or narrower and can produce an unnatural result. Instead, crop the image appropriately and then resize it while maintaining the required proportions. Once the dimensions are correct, JPG compression can be used to reduce the remaining file size. This two-step process—correct dimensions followed by controlled compression—is often more effective than relying on quality reduction alone.
Common Reasons a JPG Is Still Too Large
One common reason a JPG remains large after compression is that the original dimensions are extremely high. A 10-megapixel or 20-megapixel photograph contains a large amount of visual information, and moderate quality compression may not reduce it enough to meet a strict 20KB or 50KB limit. Another reason is that the image contains complex detail, textures, shadows, or many colors. JPG compression works differently depending on image content, so two photographs with identical dimensions can have very different file sizes after being processed using the same quality setting.
Metadata can also contribute some additional file size. Photographs produced by cameras and smartphones can contain information such as capture details, device information, orientation data, and other metadata. Removing unnecessary metadata can help reduce the file slightly, although metadata removal alone is rarely enough to transform a multi-megabyte photograph into a 20KB file. The largest improvements usually come from appropriate resizing and compression.
Another common mistake is assuming that changing the filename extension changes the actual format. Renaming “photo.png” to “photo.jpg” does not convert the image into a properly encoded JPG. The image must actually be exported or converted as JPG. Similarly, repeatedly compressing an already compressed image can reduce quality without providing an efficient path to the target size. For best results, keep the original image and create the final compressed version from that source.
How to Compress JPG to Exact or Target KB Size
When a website requires a specific target such as 20KB, 50KB, 100KB, or 200KB, target-size compression can make the process easier. Instead of manually guessing a JPG quality percentage, a target-size workflow attempts to produce an image near the specified file size. Depending on the image, the system may need to adjust quality, dimensions, or both. Because JPG encoding is content-dependent, an exact file size cannot always be achieved while maintaining the same dimensions and visual quality. A good workflow therefore treats the requested size as a target and verifies the generated file afterward.
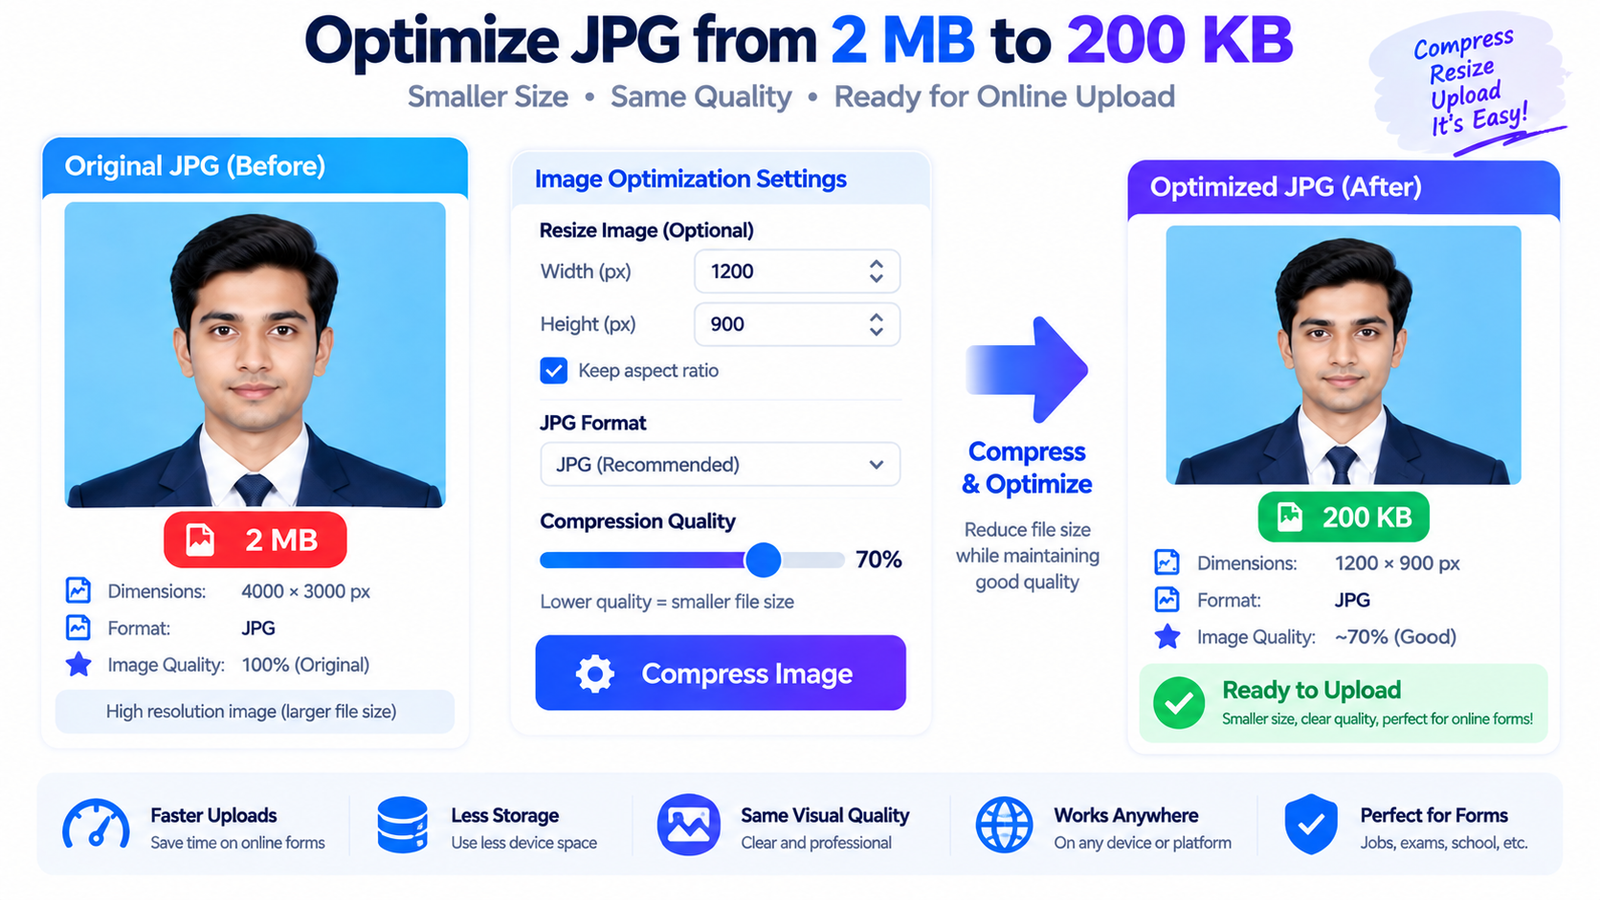
Suppose you start with a 2MB photograph and need a 100KB version. A sensible process is to resize the photograph to the required dimensions, encode it as JPG, and apply compression. If the resulting file is 130KB, increase compression slightly or reduce dimensions if the requirements allow it. If it is only 70KB and appears unnecessarily soft, increase the quality or dimensions within the permitted specifications. This gives you control over the trade-off between size and quality rather than blindly applying the strongest available compression.
For applications that specify a range, target the middle of the acceptable range when practical. If the requirement is 20KB–50KB, a file around 35KB–45KB provides some margin below the upper limit while avoiding unnecessary compression. However, this is a practical strategy rather than a universal requirement; always follow the application's published instructions. After creating the file, check the file properties and, if possible, confirm the upload requirements one more time before submission.
How to Compress JPG for Online Forms Without Losing Clarity
The most important principle is to avoid unnecessary compression. A smaller file is not automatically a better file. If a photograph becomes heavily pixelated or a signature becomes unreadable, reducing the file further may make the upload technically smaller but practically unusable. Instead, determine the minimum acceptable quality for the intended application and reduce file size around that requirement.
Use the original image as your source whenever possible. If you have already compressed a JPG several times, go back to the original and create a new optimized copy. This prevents multiple generations of lossy compression from accumulating. Before downloading or uploading the final image, zoom in enough to inspect important details and then view it at normal size. Some artifacts that look obvious at extreme magnification may not matter in the final form, while small problems in a signature or face can be important at normal viewing size.
Finally, verify the final file rather than relying on the settings used to create it. Check the extension, actual file size, dimensions, and visual quality. If the portal has a preview function, use it before final submission. If the portal rejects the image, read the exact error message because the problem may be dimensions or format rather than file size. A systematic workflow helps avoid repeated trial and error and makes it easier to prepare photographs, signatures, and other JPG images for online applications.
Step-by-Step: Compress JPG to 20KB, 50KB, 100KB or 200KB
Compress JPG to 20KB, 50KB, 100KB or 200KB
Step 1: Check the application requirements. Find out the accepted format, maximum or minimum file size, required dimensions, aspect ratio, and any other instructions. Do this before editing the photograph.
Step 2: Select the original JPG. Use the highest-quality original available rather than a previously compressed copy. Keep the original safely stored so that you can create another version if needed.
Step 3: Crop the image. Remove unnecessary areas while maintaining the composition and aspect ratio required by the application. For a passport-style photograph, ensure the face remains properly positioned.
Step 4: Resize the image. Set the width and height required by the online form. If exact dimensions are not specified, avoid maintaining an unnecessarily large resolution.
Step 5: Choose JPG format. If JPG/JPEG is an accepted format, export the image as a JPG rather than simply renaming another file format.
Step 6: Set the target size. Depending on the requirement, choose a target such as 20KB, 50KB, 100KB, or 200KB. If the tool does not offer target-size compression, adjust JPG quality manually.
Step 7: Inspect the result. Check the file size, dimensions, clarity, face details, signature readability, and overall appearance.
Step 8: Make a small adjustment if necessary. If the file is too large, increase compression or reduce dimensions where permitted. If it is unnecessarily small and blurry, use a higher quality setting.
Step 9: Save the final copy. Give the optimized file a clear name such as photo-50kb.jpg or signature-100kb.jpg so you can identify it easily.
Step 10: Upload and verify. Upload the final file to the application portal and confirm that the website accepts the format, dimensions, and file size.
Frequently Asked Questions About JPG Compression
How do I compress a JPG to 20KB?
To compress a JPG to 20KB, first resize the image to the dimensions required by the application and then apply JPG compression. Because 20KB is a very small target for a photograph, both dimensions and compression may need to be adjusted. Check the final file size and image clarity before uploading.
How do I reduce a JPG to 50KB?
Resize the JPG to an appropriate resolution and use moderate JPG compression. If the resulting image is above 50KB, increase compression gradually or reduce dimensions if the application permits it. Always verify the final file size rather than relying on a particular quality percentage.
How can I compress a JPG to 100KB?
For a 100KB target, resize the image according to the application's requirements and then adjust JPG quality until the output is at or below the permitted limit. A 100KB target generally provides more room for image detail than a 20KB target, but the result depends on the original photograph.
How do I compress a JPG to 200KB?
Start with the correct image dimensions and export the photograph as JPG. Apply moderate compression and check the resulting file size. If the image is larger than 200KB, increase compression slightly or reduce dimensions when allowed.
Can I compress a JPG without losing quality?
JPG is a lossy format, so aggressive compression can reduce visual quality. However, you can minimize visible quality loss by using appropriate dimensions, moderate compression, and the original image as your source. For many online forms, carefully optimized JPG files can remain visually clear while being substantially smaller.
Why does my JPG become blurry after compression?
The image may be blurry because the compression level is too aggressive, the dimensions were reduced too much, or the image has already undergone multiple compression cycles. Start again from the original image and use a larger target size or higher quality setting if the application's requirements allow it.
What is better for government forms: 20KB or 100KB?
Neither is universally better. The correct file size is the one specified by the particular application. If the form requires a maximum of 20KB, use a file that meets that limit. If it accepts up to 100KB, you can use a larger file if doing so helps preserve image clarity.
Does reducing image dimensions reduce JPG file size?
Yes. Reducing width and height decreases the number of pixels stored in the image and can significantly reduce the resulting JPG size. However, dimensions should not be reduced below the requirements of the application.
Should I compress a photo or signature differently?
Yes, because photographs and signatures contain different types of visual information. A photograph contains continuous tones, colors, and textures, while a signature contains thin, high-contrast strokes. Aggressive compression can make signature lines jagged or unclear, so inspect signatures carefully after processing.
Can I compress JPG images online?
Yes. Browser-based image compression tools can resize and compress JPG files without requiring traditional desktop image-editing software. When choosing a tool, look for clear target-size controls, file-size reporting, format options, and a straightforward download workflow.
Why is my 20KB JPG not accepted by the application?
File size may not be the only requirement. The application could also require particular dimensions, aspect ratio, JPG encoding, minimum file size, image background, or other specifications. Check the portal's complete image instructions and compare them with the properties of your final file.
What is the difference between JPG and JPEG?
JPG and JPEG generally refer to the same image format. The different extensions originated from historical filename-extension limitations. Most modern applications treat JPG and JPEG as equivalent, but you should always follow the extension specified by the particular upload portal.
Can I compress a 2MB JPG to 20KB?
It is possible in many cases, but the result depends on the image. A reduction from 2MB to 20KB is substantial and may require both resizing and strong compression. The final image may lose some detail, so verify whether the resulting quality and dimensions satisfy the application's requirements.
What is the best way to compress JPG images for online applications?
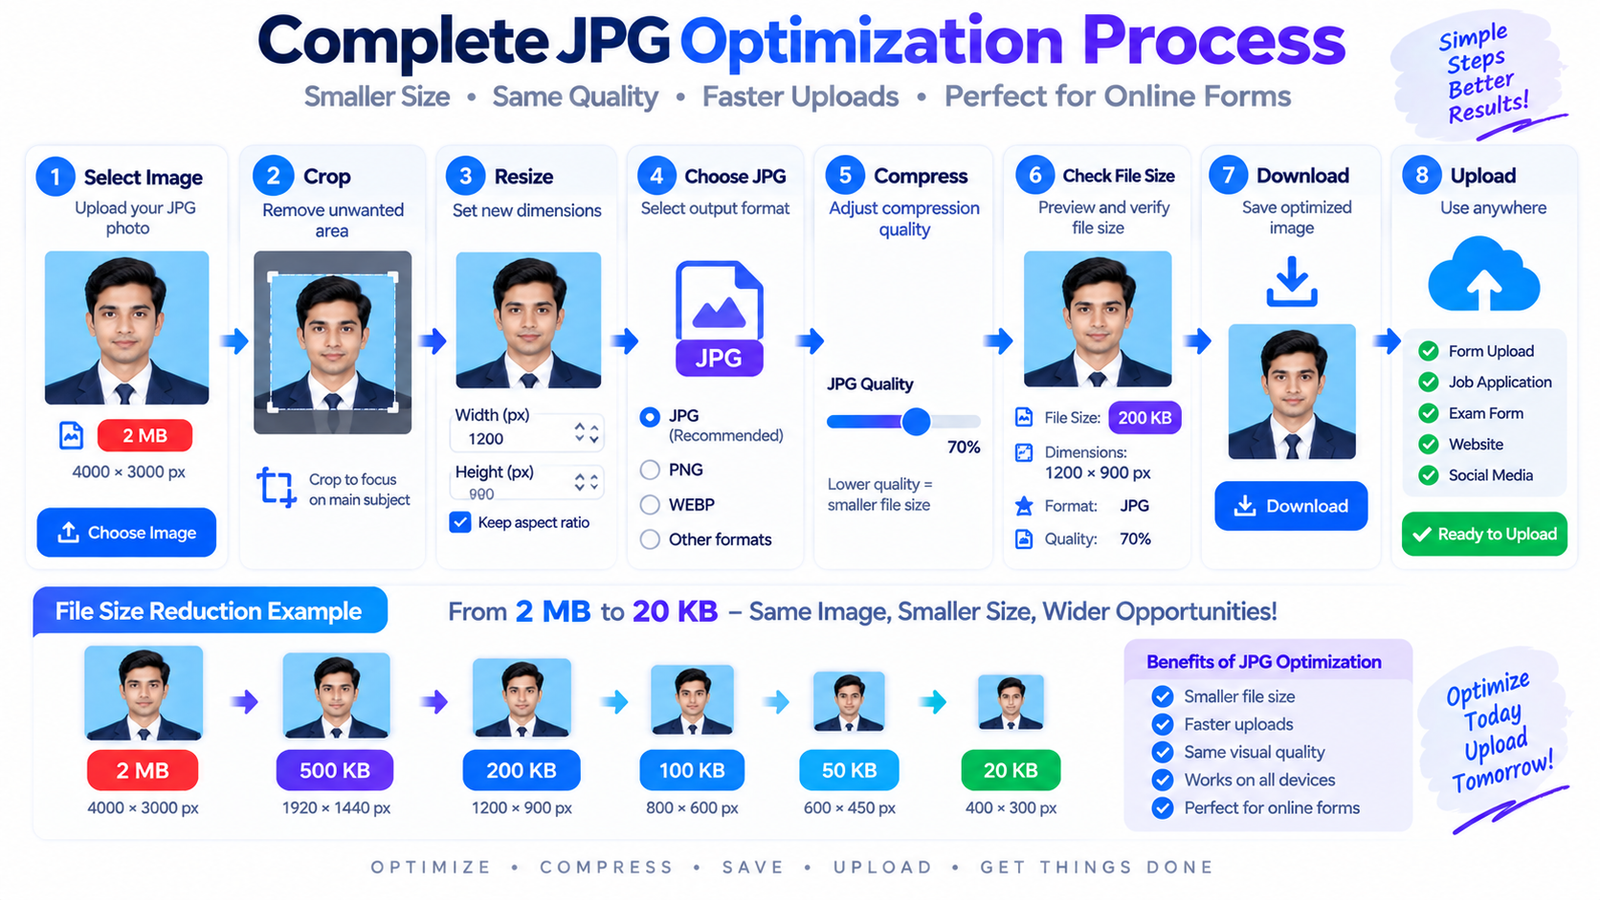
The most reliable workflow is to check the application's requirements, crop the image appropriately, resize it to the required dimensions, convert or export it as JPG, adjust compression toward the target file size, and verify the final file before uploading. This approach balances file size, dimensions, format, and image quality.
Conclusion: Compress JPG to the Right Size Without Sacrificing Usability
Learning how to compress JPG to 20KB, 50KB, 100KB or 200KB is useful whenever an online application places strict limits on uploaded photographs, signatures, or documents. The key is not simply to make an image as small as possible. Instead, you should combine correct dimensions with controlled JPG compression and verify the final output against the application's requirements.
For very small targets such as 20KB, resizing can be just as important as compression. For 50KB, 100KB, and 200KB targets, moderate compression may provide a better balance between file size and visual clarity. Always begin with the original image, maintain the required aspect ratio, use the correct format, and inspect the final file before uploading.
Whether you are preparing a photograph for an examination application, recruitment form, scholarship portal, admission form, government service, or another online application, the same basic workflow applies: check the requirements → resize → compress → verify → upload. By following these steps, you can create a lightweight JPG that meets the required file-size limit while retaining the clarity needed for successful online submission.
Share this guide
P
Pushpam Abhishek
Founder & Lead Developer · ReducerImage
Founder of ReducerImage based in Muzaffarpur, Bihar. Architect of the 100% client-side privacy-first image compression and format optimization engine with zero cloud uploads.

Reader Comments (0)